A quick bookcase...

So there's this guy, let's call him Dave.  Because that's his name.  Recently he asked me to build him a bookcase for his studio.  Nothing special, inexpensive, but something cool.  Here's what happened:

​Since budget was a big factor, I used sanded B/C construction grade plywood.  It's basically a little nicer grade of house sheathing.  Although it's great to work with beautiful, pristine materials, I also love the challenge of making something beautiful with utilitarian materials.  

The corners are mitered, glued and cross nailed with masonry nails, which have a thick, irregular head.  The heads are set just on the surface, not driven home.  Sorta like a row of rivets on a steel bridge.  It's not traditional joinery, but it's strong and interesting and quick.  Fits in with the whole industrial vibe.  The feet are blocks cut from an LVL beam, so they match the plywood edge perfectly.  

Dining set part 2

The original concept for this dining set was from NYC architect Gary Deam of Deam Design.  He designed the apartment this project is for, incorporating a long built in banquette to anchor the dining area.  I was asked to design and build the individual pieces.  Trestle tables work best with banquettes, so that was my starting point.  The chair design is a refinement of a chair that I have built a couple of times in the past.  And the banquette was designed to have clean lines and comfortable geometry.  Since the space was going to feel refined and comfortable, I wanted to introduce something bold and a little rugged as counterpoint.  So I used reclaimed Heart Pine, with all its cracks, holes, and character.  On certain surfaces I planned to keep the antique patina of the old beams.  

Here are boards for the tabletop being laid out:

Tabletop boards

The trestle assemblies (legs) for the table, with the top in the background:

Table components

A chair, beginning to take shape:

Chair, under construction

And finally, the banquette takes form.  (Notice the cutout in the seat:  I made the seat with two lids that hinge up so the bench can be used for storage as well.)

Banquette in shop

Next time:  Final pictures!

Dining Set

I'm going to do this next post as a little series to give a glimpse of the process (or lack thereof) behind what I do.  Bear with me:  I'll include pictures and try not to talk too much.

First, an Idea:  Long built-in banquette, table, chairs

Sketches

Next, lumber:  Reclaimed beams from M. Fine Lumber in Brooklyn

At the lumber yard

Lumber for the project

Check back soon for the next installment...

Something random for the weekend

A blog called The Online Photographer that I read regularly sometimes does something called Open Mike, where the post is something of interest and worth, but has nothing to do with the usual subject matter.  I like the idea, and I wish it were mine.  Alas.

A few years ago, I was out for a night run and saw the building in the photo below.  It was called the Charms Building.  It was built as an Elks Lodge in 1914 and later occupied by the Charms Candy Company in the 40's.  

It's in Asbury Park, NJ (where I live) and had  been slated for demolition.  Apparently that had begun earlier in the day, but night had come too soon for the job to be completed.  I cut my run short to go home and get my camera, and spent some time that night in 18° temps and 20+ mph winds to try and make a good photo.  It's the second best photo I've made.

Toolboxes...

It took me about ten years and five attempts before I finally made a toolbox that I was satisfied with.  Below is the result of what I learned from each of the previous attempts.  It's made from an old pine board that used to be a part of my great grandfather's potato harvesting wagon.  (That fact alone makes it the best toolbox I've ever made.)  Anyway, a picture:

This toolbox has always gotten a lot of attention, and from more than just tradesmen.  I've long felt that a lot of people would like a similar toolbox.  For tools of course, but also for other stuff.  Recently I made a batch of toolboxes out of some amazing weathered cedar fence pickets.  They're essentially boxes made for holding and carrying stuff, so use your imagination.  Magazines, kids' blocks, a potted herb garden, old photographs, mittens, picnic supplies... oh, yeah, and tools!  (Filled with tools, it makes one of the best housewarming gifts a new homeowner could get.)

The three pictured below are still available.  They are available through my etsy store.  I will be making small batches of these from time to time as my schedule allows.  Of course, if enough people want to put in orders, I'll be happy to oblige.


_MG_3619.jpg

Continuing the reclaimed theme for a moment...

Here are a couple of closets that got very fast, useful, and cost effective makeovers.  You might recognize those shipping crates again...

The doors here have been clad in whitewashed old slats from those crates.  The closet interiors are made from (relatively inexpensive) common grade pine boards.  The little bins hug on the inside of the doors are made from the old crates.  Projects like these go rather quickly, don't cost all that much, and can make a huge difference in how you experience getting a pair of socks in the morning.  Drop me a line if you think something like this would make sense in your home. :)

And now, some results...

I usually don't use before-and-after shots but here I think it is fitting.  

Once upon a time there was a fireplace in a wall in a room.  And it needed help.

20926802_0775000-1.jpg
The design constraints were wide open, but the budget wasn't.  It was a perfect opportunity to break out some discarded crates!  
_MG_3745.jpg

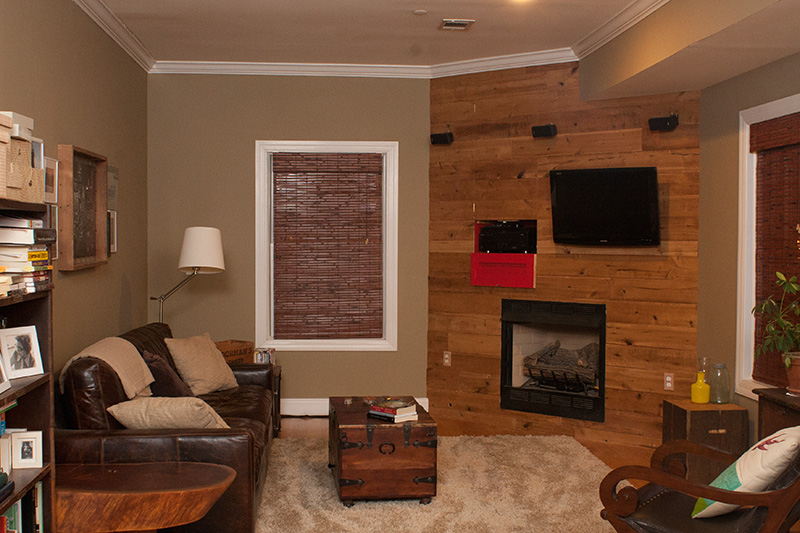
A little industrial, rustic, modern wall treatment.  The crates were made of poplar, so I cooked up some stain from old coffee that Asbury Park Roastery was throwing out.

_MG_3750.jpg

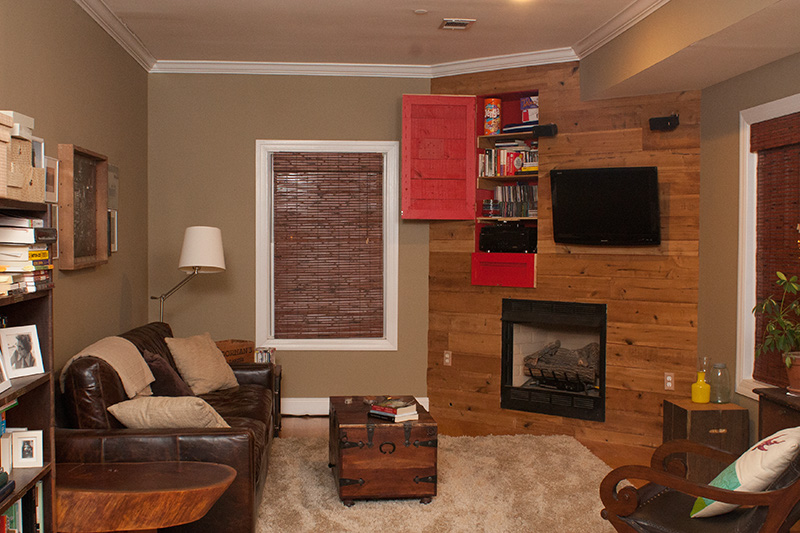
And since there was room inside the wall, who could resist building some hidden cabinetry as well?

_MG_3754.jpg